I think I first tried to do the captures through VMWare / vusb-analyzer. I had good results previously using it for reverse engineering a temperature probe protocol. This was relatively simple, but had to be done very carefully since vusb-analyezr isn't very fast and had difficulty handling the large packet dumps. I also had to direct VMWares log to a RAM disk as it couldn't keep up writing to my SSD. Even still, I tried decoding some images from the dumps and they had tearing problems. Heres the image captured from the AmScope program:

And heres a decoded image:

I can't remember if this image is actually from the captures or my libusb proof of concept program, but both had similar isuses anyway. The white square was just for size reference when I was comparing things. The first image seems to be dark while the camera is adjusting as if you look carefully the image is there.
I decided to see what else was out there. When I did some quick searches a lot of people seemed to be happy with SnoopyPro so I gave that a try. Heres a screenshot:

I found that the program wasn't very reliable and when it was working was only capturing control packets. The log file is also binary format that I didn't care to take time to learn so its not ideal for quick and dirty scripting. I thought it might be related to me using a VM but still had issues using on a real Windows XP system. No dice.
However, there is a derivative program called UsbSnoop that I had good results with. It creates a log file including some kernel details. Screenshot:

Sample log:
[7747 ms] >>> URB 43 going down >>>
-- URB_FUNCTION_VENDOR_DEVICE:
TransferFlags = 00000003 (USBD_TRANSFER_DIRECTION_IN, USBD_SHORT_TRANSFER_OK)
TransferBufferLength = 00000001
TransferBuffer = 00000000
TransferBufferMDL = fecaf148
UrbLink = 00000000
RequestTypeReservedBits = 00000000
Request = 0000000b
Value = 000001f4
Index = 00003012
[7750 ms] UsbSnoop - MyInternalIOCTLCompletion(f3898126) : fido=00000000, Irp=fed47510, Context=fecb5da0, IRQL=2
[7750 ms] <<< URB 43 coming back <<<
-- URB_FUNCTION_CONTROL_TRANSFER:
PipeHandle = fecbb1f0
TransferFlags = 0000000b (USBD_TRANSFER_DIRECTION_IN, USBD_SHORT_TRANSFER_OK)
TransferBufferLength = 00000001
TransferBuffer = 00000000
TransferBufferMDL = fecaf148
00000000: 08
UrbLink = 00000000
SetupPacket =
00000000: c0 0b f4 01 12 30 01 00
This is good as most of the Linux side programs use the VMWare mangled packets which are technically correct but don't give you the raw application behavior. Its also not trivial but not terribly bad to parse. While not the most powerful, it did perform basic logging very well to the point that I was able to decode a good (no tearing) image stream from its log file.
I noticed that Wireshark had USB support (and just about every other protocol known to man...) and decided to give it a whirl. I booted up Wireshark 1.2.17. After trying some captures I noticed some read buffer overflows and poor decoding. Needless to say I wasn't impressed with things as is. Later I realized that this was a horribly old version and compiled 1.6.2 and met with much better results. Since then I've been using it as my primary development platform. Heres a screenshot:

I was using some dumb script to convert the packets from the older Wireshark version from exported C arrays due to some issues with the other saves. I don't think I tried pcap at that point for w/e reason. In any case, I wanted to see if I could integrate things much smoother.
I first looked into writing a Wireshark plugin. The most basic type is a "dissector", although I'm not really sure that's what I wanted since Wireshark could already display USB fine. I briefly looked into the export logic but it seemed more integrated into the GUI than I wanted to deal with. Additionally, I'm not sure if it could have been implemented as a plugin and if it was it would have required a lot of work. Feel free to correct me if there is a nicer export plugin interface that I missed.
My next thought was to use libpcap. While I'm sure (I really am as you'll see...) that the C interface is fine, prototyping work is best done in a scripting language like Python. I first tried a few random Python pcap libraries but found that they tended to be Ethernet / network centric. pypcap seems to be the most popular or maybe even official interface to libpcap. Unfortunately, I couldn't get it to work without seg faulting upon opening my packets. I tried to scrub out the old pcap versions I had laying around, maybe it was still related to that. It has a way to regenerate the Lua bindings but I didn't want to spend too much time with messing with it. In any case, I decided for the meantime to just use the C interface (through C++). The interfaces are pretty and easy to use and I was able to write my replay generator with minimal effort. It generates lines like this:
//Generated from packet 202/203Which I figured was flexible enough for most purposes depending on how someone defined validate_read / validate_write. In my old version it was generated like this:
n_rw = usb_control_msg(dev->udev, usb_rcvctrlpipe(dev->udev, 0), 0x0B, USB_DIR_IN | USB_TYPE_VENDOR | USB_RECIP_DEVICE, 0x023E, 0x305E, buff, 1, 500);
if (validate_read((char[]){0x08}, 1, buff, n_rw, "packet 202/203") < 0)
return 1;
//Generated from packet 204/205
n_rw = usb_control_msg(dev->udev, usb_sndctrlpipe(dev->udev, 0), 0x01, USB_DIR_OUT | USB_TYPE_VENDOR | USB_RECIP_DEVICE, 0x0003, 0x000F, NULL, 0, 500);
if (validate_write(0, n_rw, "packet 204/205") < 0)
return 1;
CAMERA_CONTROL_MESSAGE(USB_DIR_IN | USB_TYPE_VENDOR | USB_RECIP_DEVICE, 0x0B, 0x023E, 0x305E, buff, 1);
VALIDATE_READ((char[]){0x08}, 1, &buff, n_rw, "packet 84");
printk(KERN_ALERT "Generated from packet 85\n");
CAMERA_CONTROL_MESSAGE(USB_DIR_OUT | USB_TYPE_VENDOR | USB_RECIP_DEVICE, 0x01, 0x0003, 0x000F, NULL, 0);
Which required the user to define some macros to make it useful. I figured for most stuff I did the first was just fine even with the implict return. It might be a good idea to use the validate return code but that should be an easy fix later if I care.
To make the process more streamlined as I tried out different captures, my setup function looked something like this:
int replay_wireshark_setup_neo(struct uvscopetek *dev) {Which allowed me to easily regenerate the capture which seems to be working well enough at least for a first test. This is the program I used to decode images after cat'ing the dev node to a file. Full program here (WARNING: doesn't handle switching between VMWare and Linux well...may give you an oops).
sdbg("neo replay");
{
#include "replay.c"
}
sdbg("neo replay done");
return 0;
}
I did two things to get familar with linux-usb to get to this point:
- Read the "Linux Device Drivers" (LDD) chapter on USB
- Read through the Linux usb device (didn't pay attention to host) sources
Now this so far will get us a driver working on a simple endpoint to device node. In order to move from my endpoint driver to the basic V4L2 driver I had to learn V4L2 basics. I started with the gspca V4L2 framework since a number of cameras use it. I believe UVC is a competing V4L2 framework but I don't know much about it. Anyway, the main gspca code is only a few thousand lines and isn't terribly complex so I recommend reading through it. One gotcha I had that was solved by reading through it was that the reference code I used reversed URBs for its bulk endpoint search. The reverse search code skips the first bulk endpoint since otherwise you'd want to use the forward search. This resulted in my endpoint not being detected but was confusing until I had a good enough understanding to know why that was happening. However, this didn't solve all of my problems and I did read through the V4L2 spec a bit. Its a hefty several hundred page doc but I'm sure you'd appreciate it if you wrote a serious app. Ultimately I read through the mplayer V4L2 plugin and a sample V4L2 app to get a better idea of the userland perspective.
After this I was able to convert the code over to use V4L2. Heres the 4L driver after I cleaned it up to remove some debug prints. Full WIP source here. First image it gave:

I have no idea why it started at 8 hours. Note that the colors on the right are correct. This seems to indicate there may be a sync column there since an even number of bytes in a bayer filter should not change on image boundaries. I haven't figured out how to sync frames yet.
I tried a variety of programs to display the stream. When I did a quick Google search for "linux usb camera" or something of that sort I got an Ubuntu page with some good resources. The first program on the list, Cheese, crashed with SIGSEGV on my driver. Not helpful. I found that mplayer was good for playing around with saved captures and vlc tended to be better for live captures. mplayer in particular exposes a lot of encoding options.
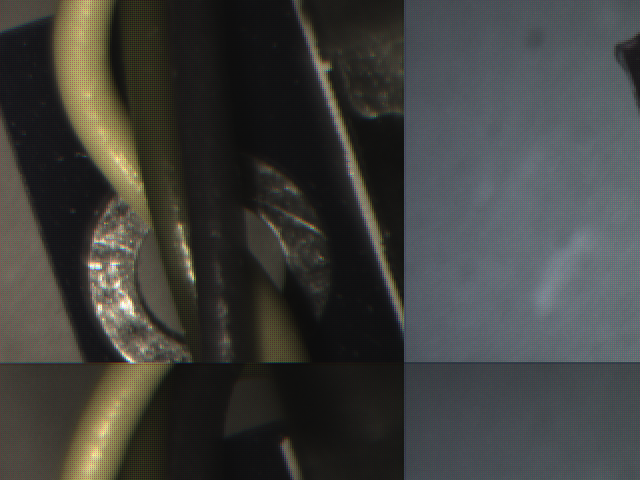
One mistake I made (but fortunately was able to realize very quickly) was that I tried to decode captures from "cat /dev/video0 >video0.bin". Why is this a bad idea? Well lets see some data first to see what my first heads up was. Here is an image taken through AmScope:

Heres is my crude bayer filter running on a capture (cat /dev/uvscopetek0 >uvscopetek0.bin) from my bulk endpoint device (ie no v4l involved, just map USB bulk endpoint to /dev/uvscopetek0):
Obviously I still need to do some work to improve brightness or whatever. Anyway, heres the same decode program ran on "cat /dev/video0 >video0.bin" output:

Hmm it doesn't look very good and was also going slow. Why is that? I then remembered from earlier two key pieces of information:
- cat was buffering reads a lowish (1024 order of magnitude) number of fixed bytes at a time (as seen from the read() requested size in a kernel debug print)
- v4l2 sends out 1 frame per read() call
Heres some shots showing the result of shifting the byte offset and how it effects the color for my crude decoder:


The take-away is that the image still looks reasonable but the colors shift. Here is a true pixel position plot:
 I was able to identify the correct decoding scheme by shifting around the red/blue/green positions until they matched the yellow, red, green colors on the wires.
One of the next challenges was to find the frame sync. I looked very carefully at the images and noticed that they got darker around the upper and left edges. Hmm. A color capture hexdump is reasonably noisy:
0000ed80 0a 08 0a 0a 0a 0a 0a 0a 0a 0a 0a 0a 0a 0a 0a 0a |................|
0000ed90 0a 0a 0a 0a 0a 0a 0a 0b 0a 0b 0a 0a 0a 0a 0a 0a |................|
0000eda0 0a 0a 0a 0a 0a 0a 0a 0a 0a 0a 0a 0a 0a 0a 0a 0a |................|
0000edb0 0a 0b 0b 0c 0c 0d 0c 0d 0c 0d 0b 0b 0b 0b 0b 0b |................|
0000edc0 0b 0c 0c 0d 0c 0d 0c 0d 0c 0d 0c 0c 0b 0b 0b 0b |................|
0000edd0 0a 0b 0a 0a 0a 0b 0a 0a 0a 0a 0a 0b 0a 0b 0a 0a |................|
But if you take away all of the light:
0000ed80 0a 08 0a 0a 0a 0a 0a 0a 0a 0a 0a 0a 0a 0a 0a 0a |................|
0000ed90 0a 0a 0a 0a 0a 0a 0a 0a 0a 0a 0a 0a 0a 0a 0a 0a |................|
*
0000f000 0a 08 0a 0a 0a 0a 0a 0a 0a 0a 0a 0a 0a 0a 0a 0a |................|
0000f010 0a 0a 0a 0a 0a 0a 0a 0a 0a 0a 0a 0a 0a 0a 0a 0a |................|
*
0000f280 0a 08 0a 0a 0a 0a 0a 0a 0a 0a 0a 0a 0a 0a 0a 0a |................|
0000f290 0a 0a 0a 0a 0a 0a 0a 0a 0a 0a 0a 0a 0a 0a 0a 0a |................|
*
0000f500 0a 08 0a 0a 0a 0a 0a 0a 0a 0a 0a 0a 0a 0a 0a 0a |................|
0000f510 0a 0a 0a 0a 0a 0a 0a 0a 0a 0a 0a 0a 0a 0a 0a 0a |................|
You get something much clearer. I'm not sure why I get lots of 0x0a...still looking into that.

